Showing posts with label Valentine's Day. Show all posts

February 14, 2011

I LOVE Valentine's Day

I admit it. I'm one of those people you love to hate. I actually love Valentine's Day. And you can't say that it's because I'm married and have someone to celebrate it with because I loved it during the nineteen years that I did not have a special someone to share it with.

I love the color and the excuse to make things, whether silly decorations or decadent desserts (although I made little to none of either this year). I also love that it's a specific time set aside to remind someone of how much you love them. It's like a yearly reminder not to take your loved ones for granted. I know many see it as a day when men forgo spontaneity and are instead forced to be romantic, but I think it's what you make of it. For me, it's a fun time to decorate, make things, and share with each other all the reasons you love the other person...reasons you think of all the time, but forget to say out loud.


Anyway, apparently my husband likes the holiday a little more than I thought because I got the following today...
delivered to me at work. Receiving flowers at work has been a secret desire of mine for years. And the chocolates were delicious (yes, I ate most of them already, although a student stole one because they fell on the floor and he "assumed" I didn't want it because it was on the floor. It was down his gullet before I had a chance to stop him).

And this was on the kitchen table when I came home...


You can't read it well in the pic, but it says "We are amazing together! Look how much fun we've had! Happy Valentine's Day! I love you." The pictures are from all different times in our relationship. Not sure when the one at top left was taken, but top right is obviously our wedding, middle left is from our sophomore year of college, middle right is our engagement, bottom left was a few months ago, and bottom right was last Christmas.

I also used Valentine's Day as an excuse to send a package to my Pop-Pop, the grandfather I don't live with. He lives by himself at an assisted living home several hours away, and I don't see him much, but I knew a little package would cheer him up. I included a heart shape note that explained the following gifts:
Slippers to keep you warm through the rest of the winter.
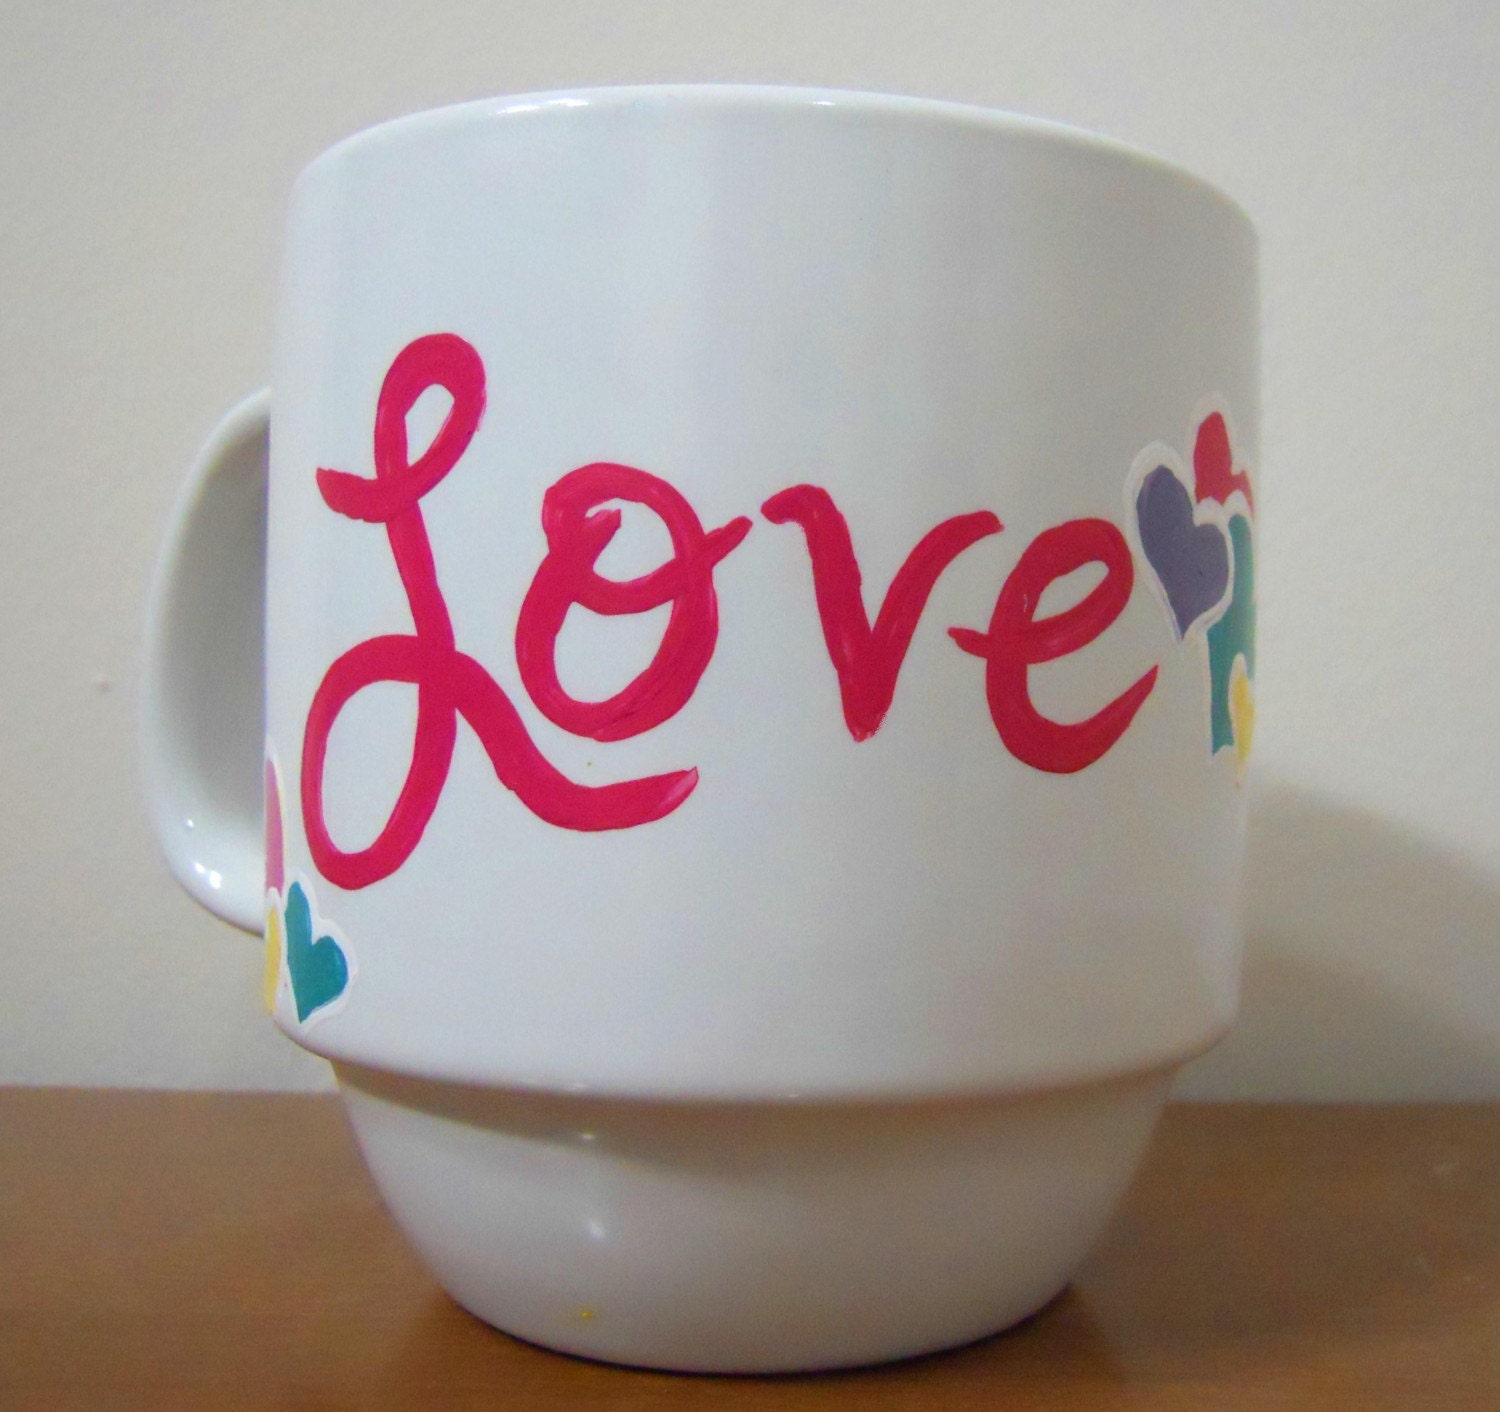


a mug I painted...


....and a little bird I crocheted...

...to remind you that spring is coming soon.


 I also included some of the stained glass hearts I made a few months ago and told him that they were to brighten up his room.


Seriously, what's not to love about Valentine's Day? I'm off now to enjoy a delicious dinner and dessert that Steve and my dearest Daddy cooked for the whole family.

January 27, 2011

Yay! Valentine's Day Shout Out to Me!

My Etsy store was mentioned in someone else's blog, someone who I don't even know. I know it's ridiculous how excited I am about it, but I am! Check out the post here! The Decorated Cookie suggests using my Valentine mugs with her dunkable marshmallows as a Valentine's Day gift. Check out her tutorial on how to make them!

Check out my mugs too here, here, and here! Have an idea for a personalized mug for a gift for your sweetie? Let me know! Now is the time to order!
Love and Hearts Mug

January 12, 2011

How To: Stained Glass Crayon Window Hangings


I love Valentine's Day, and the reason for my love of the holiday has little to do with romance and everything to do with color. It is an excuse for filling my world with colorful hearts and other random colorful decorations. Seriously, Steve thinks it's nuts when I spend my Saturdays making Valentine's Day banners with shiny paper or creating handmade Valentines for friends and family, but I LOVE it!

Last year, my sisters and I made stained glass hearts and hung them all over my parents house. Their house is particularly conducive to this, because they have many large windows. We had a blast doing it last year, and spent some really fun time together as sisters.

This year, we made a plan to do it today if I had a snow day, but by the time we did it, Holly and I were the only ones interested, and it wasn't quite as fun. Apparently, Katie only did it last year because she got to make kissing dinosaurs.

Anyway, this year I thought it would be good to do what I intended to do last year, and make a blog post chronicling the event. This year I decided I'd actually make a how to out of it
because it's so fun! It's a great project for kids too, as long as mom or dad does all of the ironing.

So here goes my first "How to."

How To: Stained Glass Window Hearts


Materials:
Crayons
Pencil Sharpener
Several cups or small containers
Waxed paper
Towel (optional)
Ironing board
Scissors
Cookie cutters for
tracing (optional)
Tape

Step 1: Choose your crayons and start sharpening.

We happened to have a huge tub of crayons, many of which are from when I was in fifth grade around the time when Crayola opened their new location in downtown

Easton. Some of them say "name coming soon" because it was during that new color naming contest. Anyway, Crayola donated a ton of boxes to our school, so I had at least two boxes of 96 count crayons. Needless to say, we had tons of extra crayons that no one minded losing.

This process took me awhile. I sat in front of the TV and sharpened crayons while I waited to find out if I had a snow day. I found it helpful to use one of those sharpeners with the container on the bottom, so I didn't get shavings all over the floors. I used a ton of different colors also.
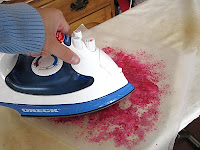
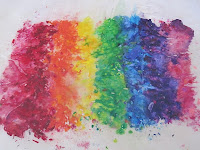
I filled small glasseswith several shades of seven different colors.

Step 2: Start ironing.

For this step you'll need your ironing board, iron, waxed paper,

crayon shavings, and possibly your towel.
Cut out two pieces of waxed paper and lay one of them on the ironing board.

Sprinkle whatever color you're going to use on top of it. At first I sprinkled it so that most of the
sheet was covered, then after ironing, I decided it was better to keep it a bit more sparsely covered. Once you're done, cover with the other piece of waxed paper.

At first I covered it with the towel before I started ironing. If you're worried about messing up your ironing board and/or your iron, it would be a good idea to use the towel. I would put an old one underneath the waxed paper (the color seeps through the paper a little bit and gets onto the ironing board) and one on top of the waxed paper. However, I found that when I put the towel on top of the waxed paper the crayons didn't melt well, so I did not use a towel on top. As long as I was careful, I didn't have a problem with the paper melting to the iron.

This step is really fun. The wax melts very quickly and you can manipulate it with the iron, making it swirl.

I did several different colors and then tried some patterns and rainbows. It's totally up to you how completely you iron it; the more you melt the wax the easier it will be to cut out shapes, but it will still work if it's thicker.


Step 3: Start Cutting

Once you have all of your shavings ironed, you can start cutting out shapes. You could use cookie cutters to trace shapes, but I like the way everything looked when I did it freehand. I did all different sizes and shapes of hearts. Sharper scissors are best here because you'll have less breakage in the wax.


Step 4: Start Decorating

Tape them to your windows, hang them from window frames or the ceiling, or make a garland. Whatever you do, try to keep them in a spot with light coming in from behind them. This will allow the color to show up well. Check out what we did.


LinkWithin

Related Posts Plugin for WordPress, Blogger...