
I love Valentine's Day, and the reason for my love of the holiday has little to do with romance and everything to do with color. It is an excuse for filling my world with colorful hearts and other random colorful decorations. Seriously, Steve thinks it's nuts when I spend my Saturdays making Valentine's Day banners with shiny paper or creating handmade Valentines for friends and family, but I LOVE it!
Last year, my sisters and I made stained glass hearts and hung them all over my parents house. Their house is particularly conducive to this, because they have many large windows. We had a blast doing it last year, and spent some really fun time together as sisters.

This year, we made a plan to do it today if I had a snow day, but by the time we did it, Holly and I were the only ones interested, and it wasn't quite as fun. Apparently, Katie only did it last year because she got to make kissing dinosaurs.
Anyway, this year I thought it would be good to do what I intended to do last year, and make a blog post chronicling the event. This year I decided I'd actually make a how to out of it
because it's so fun! It's a great project for kids too, as long as mom or dad does all of the ironing.
So here goes my first "How to."
How To: Stained Glass Window Hearts

Materials:
Crayons
Pencil Sharpener
Several cups or small containers
Waxed paper
Towel (optional)
Ironing board
Scissors
Cookie cutters for
tracing (optional)
Tape
Step 1: Choose your crayons and start sharpening.
We happened to have a huge tub of crayons, many of which are from when I was in fifth grade around the time when Crayola opened their new location in downtown

Easton. Some of them say "name coming soon" because it was during that new color naming contest. Anyway, Crayola donated a ton of boxes to our school, so I had at least two boxes of 96 count crayons. Needless to say, we had tons of extra crayons that no one minded losing.
This process took me awhile. I sat in front of the TV and sharpened crayons while I waited to find out if I had a snow day. I found it helpful to use one of those sharpeners with the container on the bottom, so I didn't get shavings all over the floors. I used a ton of different colors also.
 I filled small glasseswith several shades of seven different colors.


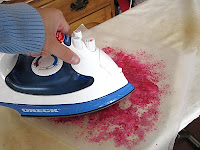
Step 2: Start ironing.
For this step you'll need your ironing board, iron, waxed paper,

crayon shavings, and possibly your towel.
Cut out two pieces of waxed paper and lay one of them on the ironing board.

Sprinkle whatever color you're going to use on top of it. At first I sprinkled it so that most of the
sheet was covered, then after ironing, I decided it was better to keep it a bit more sparsely covered. Once you're done, cover with the other piece of waxed paper.
At first I covered it with the towel before I started ironing. If you're worried about messing up your ironing board and/or your iron, it would be a good idea to use the towel. I would put an old one underneath the waxed paper (the color seeps through the paper a little bit and gets onto the ironing board) and one on top of the waxed paper. However, I found that when I put the towel on top of the waxed paper the crayons didn't melt well, so I did not use a towel on top. As long as I was careful, I didn't have a problem with the paper melting to the iron.
This step is really fun. The wax melts very quickly and you can manipulate it with the iron, making it swirl.

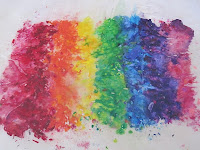
I did several different colors and then tried some patterns and rainbows. It's totally up to you how completely you iron it; the more you melt the wax the easier it will be to cut out shapes, but it will still work if it's thicker.


Step 3: Start Cutting
Once you have all of your shavings ironed, you can start cutting out shapes. You could use cookie cutters to trace shapes, but I like the way everything looked when I did it freehand. I did all different sizes and shapes of hearts. Sharper scissors are best here because you'll have less breakage in the wax.


Step 4: Start Decorating
Tape them to your windows, hang them from window frames or the ceiling, or make a garland. Whatever you do, try to keep them in a spot with light coming in from behind them. This will allow the color to show up well. Check out what we did.


No comments:
Post a Comment