Showing posts with label decorations. Show all posts

December 09, 2015

How to Make Six-Pointed Snowflakes

I have a confession. I am a little prideful about my snowflake making abilities. I make pretty awesome snowflakes. But here's another confession; anybody can make them. They're SUPER easy.
So I thought I'd share a quick tutorial. There are probably hundreds of these tutorials online, but, oh well, here's one more.

Start with a piece of white paper and scissors.

 The paper needs to be square in order for these to work, so with a regular piece of 81/2"x11" you need to start by making it square. Do this by folding one corner up to meet the other side. Cut along the edge.


 Leave the square folded in half in an isosceles triangle.

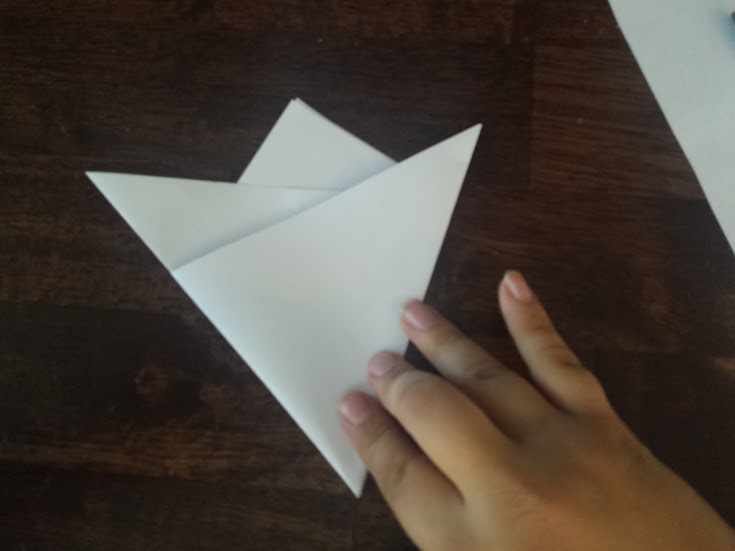
Now comes the trickiest part. You're going to fold the right corner up toward and past the center. Then do the same thing with the left corner. You want all of the side to meet up and a perfect point, so this takes a bit of trial and error.

Right side


Left Side

All edges line up.

Good point.
Edges don't meet. Needs fixing.

Bad point. Needs fixing.
 Once you've got all of you're edges lined up and a nice point, you're going to fold the whole thing in half.

It really doesn't matter which way you fold here, as long as you fold in half.

Now that you're done folding, you can start cutting. It's important to notice the difference in the two sides before you cut.
The side shown above, that is closed, while make the points of the snowflake.

The other side, pictured above, the open side, will create the space between the points. I usually start by cutting into the open side.
So you can see here, the left side will be the point.


 Now it's up to you. The more space you create by cutting, the lacier and more delicate your snowflake will be.

Cutting into both sides as pictured above, will create a snowflake like the one below.


Cutting into to only the open side, like the picture above, will create a snowflake like the one below.


Be sure to cut off the tip also. This creates the hole in the middle of the snowflake. You'll find that different kind of cuts here create different shapes in the middle.
I love the way the house looks when the sun shines through the windows. Snowflake shadows everywhere!

January 13, 2011

Cranes, Coffee, and Candles

Over a year ago, I threw a bachelorette party for my friend Traci. It was long enough ago that she is now happily married and about three months pregnant. After the party, I intended to make a blog post about the theme and decorations, but never seemed to get around to it, but I'm finally going to do it now, like I promised a few posts ago. Also, don't worry about any inappropriate content that you might normally see at a bachelorette party; it was not that kind of party. In fact, her mom was there. :o)

The party centered around a black and white theme. In addition to the colors, I also focused a great deal on origami cranes because I knew they were going to be a big focus at her wedding. I don't remember the exact date of the shower—I believe it was in November—but it was close enough to Christmas that I was able to get some of my decorations out a little early, yet far enough away that my tree wasn't up yet.

I started by making black and white origami cranes in various sizes. I placed most of them throughout the room, but I also threaded several onto a a black piece of thread, separating them with knots, and hung them in the doorway.

I had some black and silver wired ribbon which I twisted and arranged with some pin boughs and white Christmas ornaments. Throughout all of this I scattered candles.


My husband happens to like black and white decorations (our couch is black leather and most of our living room furniture is black) so I already had some black and white painted wine bottles. At my wedding shower, my sister had a wooden sign that said “Wish” placed among my presents. I kept the sign, repainted it in black and white, and placed it among Traci's presents. I also bought some black and white wedding themed confetti and sprinkled that on the gift table.
Traci loves coffee (particularly Starbucks), so for favors, I bought some black and white mugs and painted them with different designs. Inside the mugs, I placed small bags of specialty coffees and wrapped the whole thing in clear gift bags and tied it with a black satin ribbon.

For food, I kept with the black and white theme and made Black and White Cheesecake Bars, Coconut (Haupia) and Chocolate Pie, black and white cupcakes, and Kahlua Espresso Martinis. I rimmed the glasses with melted chocolate. The cupcakes I decorated with edible pearls and white chocolate. I printed out words and pictures covered them with waxed paper, and traced the pictures and words with white chocolate that I piped onto the waxed paper. Once that dried, I used it to garnish the cupcakes. Important note: I bought special food coloring to make the black icing. It looked great (although a little messy), but the food coloring stained everyone's mouths purple. I also made chocolate truffles and dipped them in white chocolate with dark chocolate garnish. And of course chocolate covered strawberries in white and dark chocolate.

  It ended up being a really fun party with just the right amount of scandalousness to still be a bachelorette party, yet not so much to make anyone uncomfortable (at least I don't think so). If you're interested in what games we played because you're planning your own party, let me know, I can give you a list. Anyway, I'm pretty sure everyone had a good time, especially Traci, which was my goal, but I guess the real proof is in the pictures.


LinkWithin

Related Posts Plugin for WordPress, Blogger...